
Introduction
The Abstract Factory Pattern is a way to group the creation of related objects, like products of a certain brand or make by building a common factory interface. If this all sounds abstract, a picture can help:
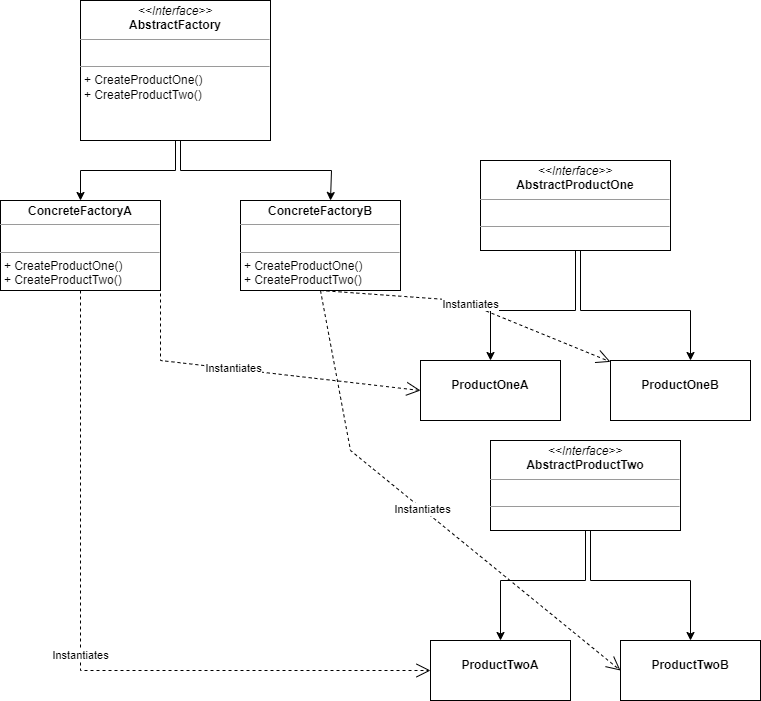
A short breakdown:
- All the factories have a common interface called AbstractFactory
- The concrete factories, in our diagram there are two, implement this interface
- These concrete factories produce objects with a common interface so those are interchangeable. In our example those are called AbstractProductOne and AbstractProductTwo
This is a somewhat more complicated design pattern, but when used well can lead to interchangeable concrete implementations. However, considering the relative complexity of this pattern, it will require extra initial work. Also, due to the high abstraction levels, it can lead in some cases to code that is more difficult to test, debug and maintain.
So, even though this pattern is very flexible and powerful, use it wisely and sparingly.
Implementation in Rust
Our abstract factory will make two kinds of vehicles, cars and motorbikes, of two different brands imaginatively name Brand A and Brand B.
Defining the brands
We will start by defining the two brands in an enum:
#[derive(Debug, Clone, Copy)]
enum Brand {
    BrandA,
    BrandB,
}
Note that the enum has a derive attribute which automatically implement three traits:
Debug: This allows instances of Brand to be formatted with the {:?} formatter. This can be helpful for printing and debugging.Clone: This allows for creating a copy of aBrandvalue using theclone()method..Copy: This trait allowsBrandvalues to be duplicated by a simple assignment. This is possible because the enum is simple and contains no heap allocated data.
Why both Clone and Copy? The reason is simple: Copy requires Clone to be implemented.
The Car and Bike traits
We start by defining two interfaces: AbstractCar and AbstractBike:
trait AbstractCar {
    fn description(&self) -> String;
}

trait AbstractBike {
    fn description(&self) -> String;
}
Both interfaces simply define a description() method which renders a string representation of either a car or a bike.
Defining errors
Error handling is always an important part of any program. What for example should happen when we try to construct a bike with ten wheels, or have a car with no color? That is why we define a VehicleError enum:
enum VehicleError {
    EmptyColorString,
    InvalidWheelCount(i8),
}
Note that with the wheel count error, we specify the number of wheels.
Next we implement the Display trait for the VehicleError. This provides user-friendly error messages, and ensures the error data is actually used:
impl std::fmt::Display for VehicleError {
    fn fmt(&self, f: &mut std::fmt::Formatter<'_>) -> std::fmt::Result {
        match self {
            VehicleError::EmptyColorString => {
                write!(f, "Color cannot be empty")
            }
            VehicleError::InvalidWheelCount(count) => {
                write!(f, "Invalid wheel count {}: must be between 1 and 4", count)
            }
        }
    }
}
We also want to implement the Error trait. This turns VehicleError into a proper Rust error, which integrates with the error handling ecosystem.
impl std::error::Error for VehicleError {}The factory trait
We need to be able to make these vehicles, and that is why we need a VehicleFactory trait:
trait VehicleFactory {
    fn create_car(&self, color: &str) -> Result<Box<dyn AbstractCar>, VehicleError>;
    fn create_bike(&self, number_of_wheels: u8) -> Result<Box<dyn AbstractBike>, VehicleError>;
}
Two methods, one to produce an AbstractCar, the other to produce an AbstractBike. This trait is central to the Abstract Factory pattern. It contains two methods, one for creating a car, the other one for creating a bike.
Some notes:
- Both methods return a
Resulttype, meaning that errors need to be handled by the caller. - On success, a boxed object is returned which implements the
AbstractCartrait allowing for dynamic dispatch.
Concrete implementations of cars and bikes
Next we will define the concrete implementation of a car, a BrandACar:
struct BrandACar {
    make: String,
    color: String,
}

impl BrandACar {
    fn new(color: String) -> Self {
        Self {
            color,
            make: "BrandA".to_string(),
        }
    }
}

impl AbstractCar for BrandACar {
    fn description(&self) -> String {
        format!("make: {}, color: {}", self.make, self.color)
    }
}
Some notes:
- A BrandACar has two properties: a make, and a color. This is a very simple example of course.
- We define a new method on the class, which returns a new BrandACar struct, where the make is of course ‘BrandA’ and the color can be decided by the client.
- The implementation of the AbstractCar interface is fairly straightforward, it simply returns a string representation of the car.
The BrandABike struct is very similar, only on a bike you can decide on the number of wheels:
struct BrandABike {
    make: String,
    number_of_wheels: u8,
}

impl BrandABike {
    fn new(number_of_wheels: u8) -> Self {
        Self {
            number_of_wheels,
            make: "BrandA".to_string(),
        }
    }
}

impl AbstractBike for BrandABike {
    fn description(&self) -> String {
        format!("make: {}, number of wheels: {}", self.make, self.number_of_wheels)
    }
}
As you may have been expecting, the BrandBCar and the BrandBBike are implemented in a similar fashion:
struct BrandBCar {
    make: String,
    color: String,
}

impl BrandBCar {
    fn new(color: String) -> Self {
        Self {
            color,
            make: "BrandB".to_string(),
        }
    }
}

impl AbstractCar for BrandBCar {
    fn description(&self) -> String {
        format!("make: {}, color: {}", self.make, self.color)
    }
}

struct BrandBBike {
    make: String,
    number_of_wheels: u8,
}

impl BrandBBike {
    fn new(number_of_wheels: u8) -> Self {
        Self {
            number_of_wheels,
            make: "BrandB".to_string(),
        }
    }
}

impl AbstractBike for BrandBBike {
    fn description(&self) -> String {
        format!("make: {}, number of wheels: {}", self.make, self.number_of_wheels)
    }
}
Creating cars and bikes in the factory
Now we come to the heart of the pattern, the factories. We start with the BrandAFactory:
struct BrandAFactory;

impl VehicleFactory for BrandAFactory {
    fn create_car(&self, color: &str) -> Result<Box<dyn AbstractCar>, VehicleError> {
        if color.trim().is_empty() {
            return Err(VehicleError::EmptyColorString);
        }
        Ok(Box::new(BrandACar::new(color.to_string())))
    }

    fn create_bike(&self, number_of_wheels: u8) -> Result<Box<dyn AbstractBike>, VehicleError> {
        if !(1..=4).contains(&number_of_wheels) {
            return Err(VehicleError::InvalidWheelCount(number_of_wheels as i8));
        }
        Ok(Box::new(BrandABike::new(number_of_wheels)))
    }
}
Some notes:
- The create methods return a Box around a trait object. This is because the size of the return object is not known beforehand.
- The first argument in both methods is &self and not &mut self as you might have expected: neither method changes the internal state of the struct.
- Also not the validation steps in the methods, so an error can be returned when an invalid has been supplied.
The BrandBFactory is very similar:
impl VehicleFactory for BrandBFactory {
    fn create_car(&self, color: &str) -> Result<Box<dyn AbstractCar>, VehicleError> {
        if color.trim().is_empty() {
            return Err(VehicleError::EmptyColorString);
        }
        Ok(Box::new(BrandBCar::new(color.to_string())))
    }

    fn create_bike(&self, number_of_wheels: u8) -> Result<Box<dyn AbstractBike>, VehicleError> {
        if !(1..=4).contains(&number_of_wheels) {
            return Err(VehicleError::InvalidWheelCount(number_of_wheels as i8));
        }
        Ok(Box::new(BrandBBike::new(number_of_wheels)))
    }
}
A simple utility function
Finally we need a utility function to select and create the desired factory:
fn get_factory(brand: Brand) -> Box<dyn VehicleFactory> {
    match brand {
        Brand::BrandA => Box::new(BrandAFactory),
        Brand::BrandB => Box::new(BrandBFactory),
    }
}
Time to test
Now we can add the main function to our little app:
fn main() {
    let factory = get_factory(Brand::BrandA);

    match factory.create_car("Red") {
        Ok(car) => println!("Created a car: {}", car.description()),
        Err(e) => eprintln!("Failed to create car: {}", e),
    }

    match factory.create_bike(2) {
        Ok(bike) => println!("Created a bike: {}", bike.description()),
        Err(e) => eprintln!("Failed to create bike: {}", e),
    }

    let factory = get_factory(Brand::BrandB);

    match factory.create_car("Blue") {
        Ok(car) => println!("Created a car: {}", car.description()),
        Err(e) => eprintln!("Failed to create car: {}", e),
    }

    match factory.create_bike(3) {
        Ok(bike) => println!("Created a bike: {}", bike.description()),
        Err(e) => eprintln!("Failed to create bike: {}", e),
    }


    println!("\n--- Testing error handling ---");

    match factory.create_car("") {
        Ok(car) => println!("Created a car: {}", car.description()),
        Err(e) => eprintln!("Failed to create car: {}", e),
    }

    match factory.create_bike(10) {
        Ok(bike) => println!("Created a bike: {}", bike.description()),
        Err(e) => eprintln!("Failed to create bike: {}", e),
    }
}
Line by line:
- We try and get a Brand A factory.
- Now we try and construct a red car. We need to use the match keyword here, because
create_car()returns aResult. Either an error is printed, or the car’s description. - We do the same thing for a bike.
- We repeat steps 2 and 3 for Brand B.
- Now we can test the errors, by supplying
create_car()with an empty color, andcreate_bike()with 10 wheels, both of which should result in an error.
Conclusion
As you can see, setting up the factory is quite some work even in a simple case like this one. However you gain a lot of flexibility and ease of use.
Mind you, as I said in the introduction, because of the higher level of abstraction, using this pattern can lead to extra initial work, and in some case, code that is harder to debug and maintain.
When done well, this pattern offers flexibility, even at runtime, and maintainability as it can easily be understood and extended..


